搭建vue-tsx风格的开发模板
项目创建
使用vue-cli3+创建一个基于ts的模板:
vue create vue-tsx-template

# 或者使用vue ui进入GUI模式创建
vue ui
创建的时候记得勾选typescript,css预处理器看各自喜好选择,操作步骤如下:
等待npm/yarn安装结束后就是一个基于ts的vue模板了。
vue-tsx-support
上一步中已经创建完了基于ts的vue模板,但是开发方式还是如同之前的template一样,只是将script中的js部分改成了ts来书写。接下来就将模板(template)方式改成tsx的方式,这里需要借助一个库 -- vue-tsx-support
首先安装vue-tsx-support:
npm install vue-tsx-support --save
# or
yarn add vue-tsx-support
安装结束后,我们需要对我们的文件做点小改动,首先我们在主入口文件main.ts中引入:
// main.ts
import "vue-tsx-support/enable-check";

// 省略。。
然后删掉src/shims-tsx.d.ts文件,避免和vue-tsx-support/enable-check声明重复冲突。
最后在我们的vue.config.js文件里的configureWebpack属性下增加一项resolve:
// vue.config.js

module.exports = {
  // ...
  configureWebpack: {
    resolve: {
      extensions: [".js", ".vue", ".json", ".ts", ".tsx"] // 加入ts 和 tsx
    }
  }
}
这样就可以了,接下来就可以开始开发了。
我们在/components下新建一个button文件夹,并创建一个文件button.tsx。然后开始书写我们tsx风格的vue代码:
// components/button/button.tsx
import { Component, Prop } from "vue-property-decorator";
import * as tsc from "vue-tsx-support";

interface ButtonClick {
  (value: string): void
}

interface ButtonProps {
  text: string;
  btnClick?: ButtonClick
}

@Component
export default class ZButton extends tsc.Component<ButtonProps> {
  @Prop() text!: string;

  public btnClick(value: string): void {
    console.log("value is: ", value);
  }

  protected render() {
    return (
      <div>
        <button onClick={() =>  this.btnClick("click")}>{this.text}</button>
      </div>
    )
  }
}
这样我们就完成了一个简单的tsx组件了。
接下来我们需要去views/Home.tsx中使用这个组件,删掉原来的Home.vue,并创建一个Home.tsx:
// views/Home.tsx
import { Component, Vue } from "vue-property-decorator";
import { Component as tsc } from "vue-tsx-support";
import ZButton from "@/components/button/button.tsx";

@Component
export default class HomeContainer extends tsc<Vue> {
  protected render() {
    return <Zbutton text="点我!"></Zbutton>;
  }
}
最后将App.vue改成App.tsx:
// App.tsx
import { Component, Vue } from "vue-property-decorator";

@Component
export default class App extends Vue {
  protected render() {
    return (
      <div id="app">
        <router-view></router-view>
      </div>
    );
  }
}
然后运行,能看到以下效果:
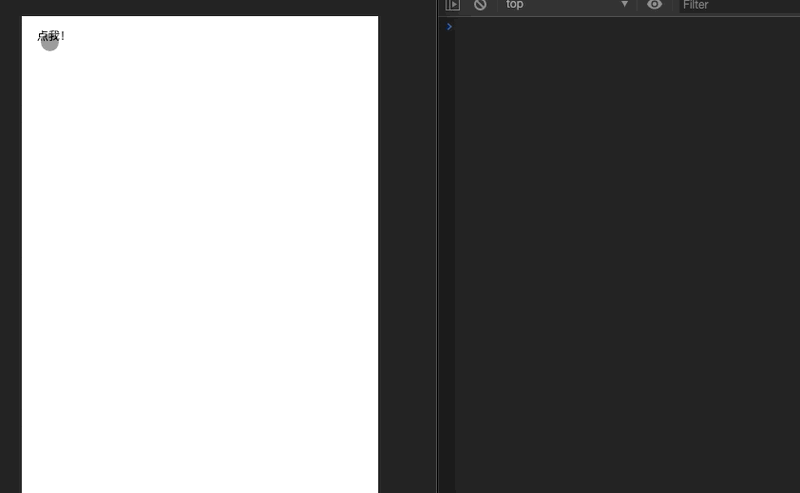
就这样完成了一个简单的tsx风格的vue项目了。
mixins
新建mixins/index.ts,在index.ts中写一个vue mixin:
// mixins/index.ts
import { Vue, Component } from "vue-property-decorator";

// 这里一定要做个声明 不然在组件里使用的时候会报不存在的错误
// 要对应mixin中的属性和方法
declare module "vue/types/vue" {
  interface Vue {
    mixinText: string;
    showMixinText(): void;
  }
}

@Component
export default class MixinTest extends Vue {
  public mixinText: string = "我是一个mixin";

  public showMixinText() {
    console.log(this.mixinText);
  }
}
然后在component/button/button.tsx中使用:
// component/button/button.tsx
import { Component, Prop } from "vue-property-decorator";
import * as tsc from "vue-tsx-support";

import MixinTest from "@/mixins";

interface ButtonClick {
  (value: string): void;
}

interface ButtonProps {
  text: string;
  btnClick?: ButtonClick;
}

// 在Component装饰器上注入mixin
@Component({
  mixins: [MixinTest]
})
export default class ZButton extends tsc.Component<ButtonProps> {
  @Prop() text!: string;

  public btnClick(value: string): void {
    console.log("value is: ", value);
  }

  // 点击事件中调用mixin的方法
  protected render() {
    return (
      <div>
        <button onClick={() => this.showMixinText()}>{this.text}</button>
      </div>
    );
  }
}
vuex
vuex的ts改造主要有两种方案,一种是基于vuex-class的方式,一种是基于vue-module-decorators的方式。
因为编码习惯的原因,喜欢在书写vuex的时候,一个module store的各个小模块都单独写成一个文件,而vue-module-decorators则是一个module store对应一个文件。所以在选择上,我选择了vuex-class,有需要的朋友也可以了解下vuex-module-decorators。
安装vuex-class:
npm install vue-class --save
#or
yarn add vuex-class
新建一个system的module,针对system的store建立各自文件
state.tsgetter.tsmutation.tsmutation-type.tsactions.ts
编写一个简单的例子,在vuex中存储user信息。
先来编写state中的内容:
// store/modules/system/state.ts

interface SystemState {
  user: Object
}

const state: SystemState = {
  user: {}
}

export default state;
mutation-type.ts:
// store/modules/system/mutation-type.ts
interface SystemMutationType {
  SET_USER_INFO: String;
}

const Mutation_Type: SystemMutationType = {
  SET_USER_INFO: "SET_USER_INFO"
}

export default Mutation_Type;
mutation.ts:
// store/modules/system/mutation.ts
import type from "./mutation-type";

const mutation: any = {
  [type.SET_USER_INFO as string](state: SystemState, user: Object) {
    state.user = user;
  }
}

export default mutation;
action.ts:
import type from "./mutation-type";
import { Commit } from "vuex";

export const cacheUser = (context: { commit: Commit }, user: Object) => {
  context.commit(type.SET_USER_INFO as string, user);
}
然后建立一个index.ts将这些外抛出去:
// store/modules/system/index.ts
import state from "./state";
import mutations from "./mutation";
import * as actions from "./action";
import * as getters from "./getter";

export default {
  namespaced: true,
  state,
  getters,
  mutations,
  actions
};
最后在store的入口文件处引用该module:
// store/index.ts
import Vue from "vue";
import Vuex from "vuex";
import system from "./modules/system";

Vue.use(Vuex);

export default new Vuex.Store({
  modules: {
    system
  }
});
接着我们去组件button.tsx中使用:
// components/button/button.tsx
import { Component, Prop } from "vue-property-decorator";
import * as tsc from "vue-tsx-support";
// 引入store命名空间 方便使用某个模块
import { namespace } from "vuex-class";

// 通过namespace(module name)的方式使用某个模块的store
const systemStore = namespace("system");

@Component
export default class ZButton extends tsc.Component<ButtonProps> {
  @Prop() text!: string;
  // store使用state和action 其他getter和mutation类型
  @systemStore.State("user") user!: Object;
  @systemStore.Action("cacheUser") cacheUser: any;

  public btnClick(value: string): void {
    console.log("value is: ", value);
    // 点击调用store的action方式存储user信息
    // 而state中的user信息会同步 可通过vue-tools查看
    this.cacheUser({ name: "张三", phone: "13333333333" });
  }

  // 点击事件中调用mixin的方法
  protected render() {
    return (
      <div>
        <button onClick={() => this.btnClick()}>{this.text}</button>
      </div>
    );
  }
}
三方组件库
目前主流的三方组件库都是支持ts的,且官方文档上都会提供ts下的demo以及配置。这里以有赞的vant作为例子。
安装:
npm install vant --save
#or
yarn add vant
在ts下如果想要按需加载vant的话,就不能使用babel-plugin-import了,而是要使用ts-import-plugin。
安装ts-import-plugin:
npm install ts-import-plugin --save-dev
#or
yarn add ts-import-plugin -D
安装结束后,需要在vue.config.js中注入到webpack中使用:
// vue.config.js
const merge = require("webpack-merge");
const tsImportPluginFactory = require("ts-import-plugin");

// 将ts-import-plugin合并到webpack配置中
const webpackMergeConfig = config => {
  config.module
    .rule("ts")
    .use("ts-loader")
    .tap(options => {
      options = merge(options, {
        transpileOnly: true,
        getCustomTransformers: () => ({
          before: [
            tsImportPluginFactory({
              libraryName: "vant",
              libraryDirectory: "es",
              style: true
            })
          ]
        }),
        compilerOptions: {
          module: "es2015"
        }
      });
      return options;
    });
}

module.exports = {
  chainWebpack: config => {
    webpackMergeConfig(config);
    // ...省略
  }
}
然后就可以在组件文件中使用vant三方组件库了:
// components/index.ts
import Vue from "vue";
import { Button } from "vant";

Vue.use(Button);
button.tsx:
// components/button/button.tsx
import { Component, Prop } from "vue-property-decorator";
import * as tsc from "vue-tsx-support";

@Component
export default class ZButton extends tsc.Component<ButtonProps> {
  @Prop() text!: string;

  public btnClick(value: string): void {
    console.log("value is: ", value);
  }

  // 点击事件中调用mixin的方法
  protected render() {
    return (
      <div>
        // 使用van-button
        <van-button type="primary">我是vant button</van-button>
      </div>
    );
  }
}
注意
这里有个问题需要注意,在ts下打包的应用会丢失三方组件库的样式,而在开发环境是没有问题的。而导致该问题的发生是ts-loader不支持多线程打包。
解决方式为在vue.config.js中配置parallel: false即可。